Effortless Testing Setup for React with Vite, TypeScript, Jest, and React Testing Library

I create professional and fast web experiences using tools like Html, Css, Tailwind CSS, Javascript (React js, Next js), Typescript, and Git/Github. Leveraging these tools, and others, I create scalable and reliable websites and Web applications with good user interfaces and user experiences.
Recently, I have been learning to write some tests in React using Jest and RTL(React Testing Library), which has been a fun and eye-opening adventure so far. Setting up testing in a Nextjs app which I used to practise testing was not too complicated, and I managed to get things working. I recently wanted to start writing some tests for a project I am working on which is a React+Vitejs, and Typescript application. This proved challenging to set up, resulting in me looking through a few outdated articles here and there, pulling a hair or 2, and almost crying about why the gods of testing were against me. Thankfully, I finally resolved my errors and had my tests running smoothly.
This post therefore serves as an easy-to-follow, updated guide on how to set up testing with Jest and React-testing-library in your Vite + Typescript application.
Challenges faced
While setting up the test in my Vite project, the 2 major problems that are commonly faced are:
Configuring Jest to handle SVG images
Handling path aliases (absolute imports) with Jest
In this post, we solve the above problems and set up testing in our application. Without wasting much time, let's jump right in.
Setting up a Vite project
Let's get started by creating a simple Vite project. Run the following command to create a React application using Vite: npm create vite@latest . Follow the instructions and select the necessary dependencies

Now, cd into your project directory and run npm install to install all dependencies.
Installing Jest and React testing library
Now let's install Jest and RTL and other related dependencies:
npm install -D jest @testing-library/react ts-jest @types/jest ts-node @testing-library/jest-dom jest-environment-jsdom @testing-library/user-event
and wait for the packages to finish installing

Great, now if you open your package.json file, you should see all of these packages as dev dependencies.
Now create a jest.setup.ts file with the following code :
import "@testing-library/jest-dom";
Also, create a jest.config.js file with the following configuration code
export default {
  testEnvironment: "jsdom",
  transform: {
    "^.+\\.tsx?$": "ts-jest",
  },
  setupFilesAfterEnv: ["<rootDir>/jest.setup.ts"],
};
Handling Styles and SVG's
Now we need 2 more packages for our test to run correctly, the first package is identity-obj-proxy which will help jest transform files with the extension .css, .less, .sass, or .scss. When a file with any of these extensions is imported into your code during testing, Jest will substitute the import with the identity-obj-proxy module. This is a common technique for mocking stylesheets in Jest tests.
The second package we need is jest-transformer-svg . When an SVG file is imported into your code during testing, Jest will substitute the import with the jest-transformer-svg module. This suggests that there might be a custom transformer (jest-transformer-svg) configured for transforming SVG files during the testing process.
To install this package, run
npm install -D identity-obj-proxy jest-transformer-svg
After successfully installing, modify your jest.config.js file to look like so:
export default {
  testEnvironment: "jsdom",
  transform: {
    "^.+\\.tsx?$": "ts-jest",
  },

  moduleNameMapper: {
    "\\.(css|less|sass|scss)$": "identity-obj-proxy",
    "^.+\\.svg$": "jest-transformer-svg",
  },

  setupFilesAfterEnv: ["<rootDir>/jest.setup.ts"],
};
Great!!, we have done a lot of configuration, let's write a test and see if things work correctly. Firstly, head over to your package.json and add the following script : "test": "jest"

Let's create a simple component that renders a list of users, with some tests for that component. Create a components folder in the src directory and create users folder with a Users.tsx file and a Users.spec.tsx file.
the Users.tsx component looks like this
const Users = () => {
  return (
    <div>
      <h1>Users</h1>
      <ul>
        <li>name 1</li>
        <li>name 2</li>
      </ul>
    </div>
  );
};

export default Users;
Our test for this component in the Users.spec.tsx file looks like this
import { render, screen } from "@testing-library/react";
import Users from "./Users";

describe("User", () => {
  test("renders heading", async () => {
    render(<Users />);
    expect(screen.getByRole("heading", { name: "Users" })).toBeInTheDocument();
  });

  test("renders a list of users", async () => {
    render(<Users />);
    const users = await screen.findAllByRole("listitem");
    expect(users).toHaveLength(2);
  });
});
We have a simple component with some test setup. let's try to run our test using the npm run test command.

Our test passes..in some cases, this will fail because of the following Typescript error:

We fix this by including our jest.setup.ts file in our tsconfig.json file like so:
{
  "compilerOptions": {
    "target": "ES2020",
    "useDefineForClassFields": true,
    "lib": ["ES2020", "DOM", "DOM.Iterable"],
    "module": "ESNext",
    "skipLibCheck": true,

    /* Bundler mode */
    "moduleResolution": "bundler",
    "allowImportingTsExtensions": true,
    "resolveJsonModule": true,
    "isolatedModules": true,
    "noEmit": true,
    "jsx": "react-jsx",

    /* Linting */
    "strict": true,
    "noUnusedLocals": true,
    "noUnusedParameters": true,
    "noFallthroughCasesInSwitch": true
  },
  "include": ["src", "./jest.setup.ts"],
  "references": [{ "path": "./tsconfig.node.json" }]
}
Specifically, we add ./jest.setup.ts as an array value of the include property. Our Typescript error now disappears and our test runs smoothly.
Handling absolute imports
When setting up our applications, some of our applications might be making use of absolutes imports for clean and readable import statements. However, using absolute imports with Jest will need tiny adjustments, Firstly let's set up absolute import or path aliases in our Vite app and then make it work with Jest. To do that, we need to install the following package
npm install -D vite-tsconfig-paths
After successful installation, we need to modify the vite.config.ts file and the tsconfig.json file. add the following code as part of the compilerOptions property
//absolute import
    "baseUrl": "./src",
    "paths": {
      "@/*": ["./*"]
    }
Our tsconfig.json file looks like this
{
  "compilerOptions": {
    "target": "ES2020",
    "useDefineForClassFields": true,
    "lib": ["ES2020", "DOM", "DOM.Iterable"],
    "module": "ESNext",
    "skipLibCheck": true,

    /* Bundler mode */
    "moduleResolution": "bundler",
    "allowImportingTsExtensions": true,
    "resolveJsonModule": true,
    "isolatedModules": true,
    "noEmit": true,
    "jsx": "react-jsx",

    /* Linting */
    "strict": true,
    "noUnusedLocals": true,
    "noUnusedParameters": true,
    "noFallthroughCasesInSwitch": true,

    //absolute import
    "baseUrl": "./src",
    "paths": {
      "@/*": ["./*"]
    }
  },
  "include": ["src", "./jest.setup.ts"],
  "references": [{ "path": "./tsconfig.node.json" }]
}
We also modify our vite.config.ts file
import { defineConfig } from "vite";
import react from "@vitejs/plugin-react";
import tsconfigPaths from "vite-tsconfig-paths";

// https://vitejs.dev/config/
export default defineConfig({
  plugins: [react(), tsconfigPaths()],
});
In your jest.config.ts file, add "^@/(.*)$": "/src/$1" to the moduleNameMapper property.
export default {
  testEnvironment: "jsdom",
  transform: {
    "^.+\\.tsx?$": "ts-jest",
  },

  moduleNameMapper: {
    "\\.(css|less|sass|scss)$": "identity-obj-proxy",
    "^.+\\.svg$": "jest-transformer-svg",
    "^@/(.*)$": "<rootDir>/src/$1",
  },

  setupFilesAfterEnv: ["<rootDir>/jest.setup.ts"],
};
Amazing!! now you can import components like so:
import Counter from "@/components/counter-two/Counter-two";
using the @ path alias and use them in your test.
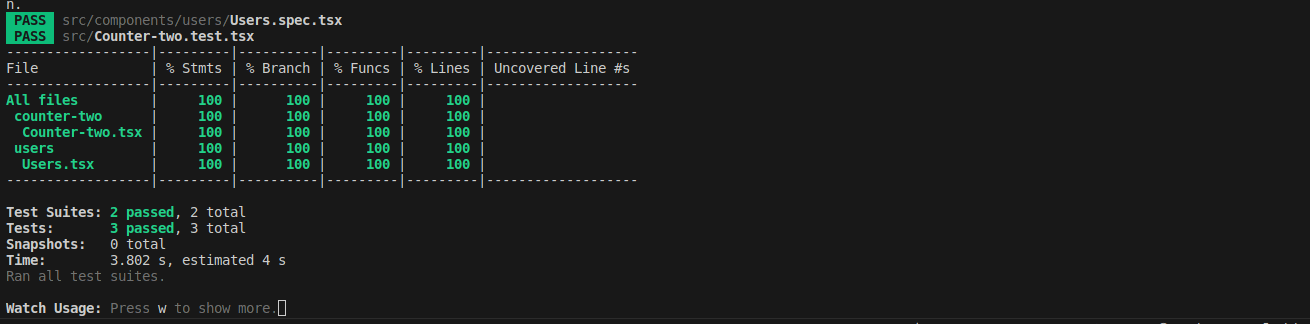
Getting test coverage report
Most often when writing tests, we need to know the test coverage. Code coverage reports provide insights into how much of your code is covered by tests. We need a command to Instruct Jest to generate code coverage reports after running the tests. Add the following command to your script in the package.json file
"coverage": "npm test --coverage --watchAll --collectCoverageFrom='src/components/**/*.{ts,tsx}'",
We then run npm run coverage . This runs Jest in watch mode and provides the coverage report after every test run.
Conclusion
Setting up tests in React+Vite and Typescript applications is not that straightforward, as we often face a lot of challenges while setting it up. This post serves as an updated, step-by-step, easy-to-follow guide on setting up tests in your React+Vite and Typescript applications.
Code: Github link


